

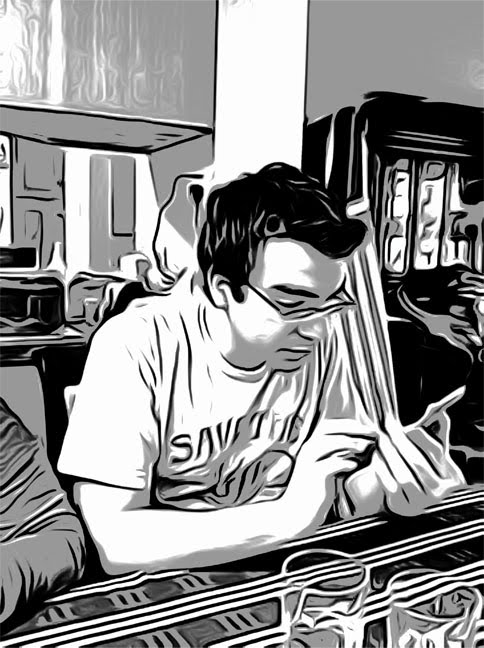
A vintage style comic panel created with ToonPAINT and Halftone.
I came across a cool one-two punch this week - a dynamic duo of iPhone apps that, when used together, create a neat vintage comic book/strip effect for photos.
The first app in this combo is ToonPAINT ($1.99 from Toon-FX). ToonPAINT lets you first convert your iPhone photos to black and white linework (with the option of a gray mid-tone) which you can then hand-paint directly on your iPhone screen.

The original image.
Once you Load the image from your Gallery (you can also shoot directly from your Camera, if you choose), the image takes a few seconds to process as Inklines. The Shading controls in ToonPAINT's Inklines stage allow you to control the amount of black and gray areas in your image, as well as the amount of edges shown. You can also use the app's Size options to fine tune the Coherence, Edge Width and Edge Length.
I've found that the size of the subject in an image will determine what works best for these options - a closeup of a face, for example, might work better with wider edges, while a full body in an image can benefit from the XS settings in Coherence and Edge width. Play around with the options until you're happy with the look of your Inklines. You can also use the Pan/Zoom feature to zoom in and get a detailed look at your linework and tone.
Inklines from ToonPAINT.
Next, move onto ToonPaint's Paint stage. There's a slider to adjust your brush (or eraser) size, and a palette with a selection of eight colors. Once you select a color, you use your finger to paint over the Inklines. You can also use the Color Picker to modify the colors in your palette, and there's a a Pan/Zoom feature in this stage as well.
However, for my experiments in getting a vintage comic book look, I've bought an additional feature - Auto Color. It's a $.99 in-app purchase, and you buy it by clicking on the icon above the palette of the lovely lady, in color, with the flowing blonde hair. By using this tool, color from the original photo is automatically added back into the image, though in a limited range, giving the image a posterized style which works really well for what I'm trying to achieve.
You can still paint on top of the colorized image, with the hand-painted colors completely replacing the original colors - and, interestingly, if you use the eraser too after Auto Coloring your image, it only erases the hand-painted color - the original color remains, which can be helpful if you want to take your time modifying one specific object in the image.

The colored image from ToonPAINT - fully colored using the application's Auto Color feature.
I've found that high-contrast images with strong lighting yield the best results - no surprise, but getting the lighting right helps ToonPAINT handle the outlines and gray tone in a more naturally comic book-like way. If your outlines aren't bold enough, your final image will look less like a printed comic and more like a printed photograph (which Halftone alone can generate just fine on its own).
Once you're happy with your colors, click Done and you'll get to the Save/Share screen. Make sure to turn on the High-res Output option (hopefully whichever camera you've taken your original image with was also set to its maximum resolution) and then Save to your Photo Gallery.
Next, fire up Halfttone ($.99 from Juicy Bits) and click the camera icon at the lower left, then Choose from Album and browse to the image you just created with ToonPAINT. Halftone will generate a dot pattern within the image, and will also add a background texture and border - both settings which you can modify later.

For the sake of comparison, this is what the original image looks like when processed directly with Halftone and not using ToonPAINT first. Not very comic-y.
When your image has finished processing, click on the gear icon in the upper left. First, make sure Full Size is set to On, so you can preserve your image at the highest resolution possible. You can then experiment with the Blend Original and Process Original features, as well as the Dot Size (the primary setting you'll want to play around with) and Dot Strength (I've always kept mine at 100% - the default).
Click Done for now (you can always go back and modify those settings later), and click the Paper icon. You can pick from 20 different gnarly backgrounds that your image "prints" onto, as well as a plain white background (more on that option later) for a clean effect. Next, click the Layout icon, which lets you select from nine pre-existing panel layouts, varying the number and position of two different styles of captions. There's even a completely captionless, borderless effect.
You can then click on the Word Bubble icon to add up to five word bubbles. Click and drag the bubbles to reposition; click and drag the tip of the tail to change its length and direction (a particularly impressive detail); and click within the bubble to modify the text, style (traditional oval, "flatter" oval, rectangle, rectangle with rounded corners, exclamatory "pointy" bubble and thought bubble), and z-position (which bubble is on top of which other bubble, if they overlap within the layout). You can also delete the bubble you're currently editing from here. Click Done when you're finished, and the bubbles will auto-size very nicely to the amount of text you've added.
Back in Halftone's main screen, you can keep adjusting the elements in your layout. Though you can't reposition the captions, you can click within them to edit your text (you'll have to change the layout to delete them completely). There's also Font option that lets you adjust the global typeface selection and size (you choose from Small, Medium, and Large options).

Detail of the final image. Dig those funky wrinkles!
Again, fine tune the look of your piece until you've got things looking the way you want them, then click on the icon in the upper right of the main screen and Save to Album. Since Halftone doesn't have a Pan/Zoom feature, I recommend opening the saved image from your Photos app and zooming and and around to make sure the results look the way you want them to.
I loved the effect I got when I first combined these two apps - it reminded me of the independent sci-fi comics I read in the late 80's/early 90's, when comic production techniques and paper quality started to improve. The Pacific Comics (and later, Eclipse Comics) anthology series Alien Worlds came to mind - many of those stories featured art with strong linework and thick blacks, colored with the kind of fluidity that mainstream comics usually couldn't achieve when printing on the typical nasty newsprint that I don't remember seeing much past the 80's.
Using this technique, it's easy to imagine creating a full-size, printable comic by exporting the full-size final images, then composing the page layouts in a full (not iPhone/iPad) version of Photoshop (or InDesign, or Illustrator, or your preferred page layout program - preferably with adjustable guides so you're not laying things out by eye). The default panel dimensions are a bit wide for the traditional 6x9" comic book page 9x9 panel layout, but they fit almost perfectly on a US Letter-sized page, as long as you overlap the borders. Since it would look odd to see the same exact page texture repeated nine times on a comic page, you could select the plain white background in Halftone before saving your images, and if you still wanted that aged effect on your page, you could put together your panel layout in Photoshop, create or buy your own background textures, then set them up as Multiply layers in Photoshop so that they cover your full page.

Letter-sized comic book page using two images. The paper texture repeats (though this can be dealt with), and the large panel is out of proportion.
I confess that I've also tried using Adobe Photoshop Express between the ToonPAINT and Halftone steps, to adjust the Exposure, Contrast and Saturation settings of the image created by ToonPAINT. This is helpful in general, in achieving a certain look (adjusting the Contrast of an image so blacks become dark grays, which really gives the panel an aged look) - and may be necessary if you're putting together a number of panels into a single comic strip or page, and want them to all look consistent.
And speaking of Photoshop Express, what if you don't want a static nine panel layout for your comic book page? Maybe you want a panel that stretches across the width of the page? Well... I don't see it happening. Yes, you can use Photoshop Express to crop the original image (or the ToonPAINT version), but when you take it into Halftone, all of the elements - background texture (if you use it) panel and word bubble border, text and dot pattern size - will be out of proportion, because you'll have to enlarge the final image to make it fit into the layout. Sure, you could shrink the Font and Dot Size in the outsized panels to try to match the look of the other panels, but that's going to take some work - and you can't enter those values numerically, so you'll be winging it every time you perform that task. And you'll have to visually eye-up the size you're cropping to every time. And if you were thinking of stitching two panels together side-by-side, you'll have to deal with manually matching up the dot patterns in each image. I'd have to say a versatile comic page layout is beyond what these two apps can comfortably do at this point - and that's fine.
Out of the box, ToonPAINT and Halftone are a great way to use your iPhone to create images that seem ripped from an old, printed comic page - all for under $5. I'm planning on putting together a short comic book story (and if my son were a little older and more cooperative, I probably would have at least one page finished at this point), so expect a trial run sometime in the near future.

An image created with the Edges setting in ToonPAINT set very high - this gives the image a more painted feel.

The boldness of the linework on this image, combined with the high contrast in the original photo, give the final panel a strong comic book look.

The different page textures in Halftone can make the image look like it was printed on aged newsprint, cardboard, and other wrinkled, ripped, and otherwise-distressed materials.
You Rock!
ReplyDeleteThanks, Bruce - it's a great app!
ReplyDeleteAMAZING, thanks for taking the time to do all this!!
ReplyDeleteYou ARE THE MAN........